Modern Casual Sprinter Van Makeover
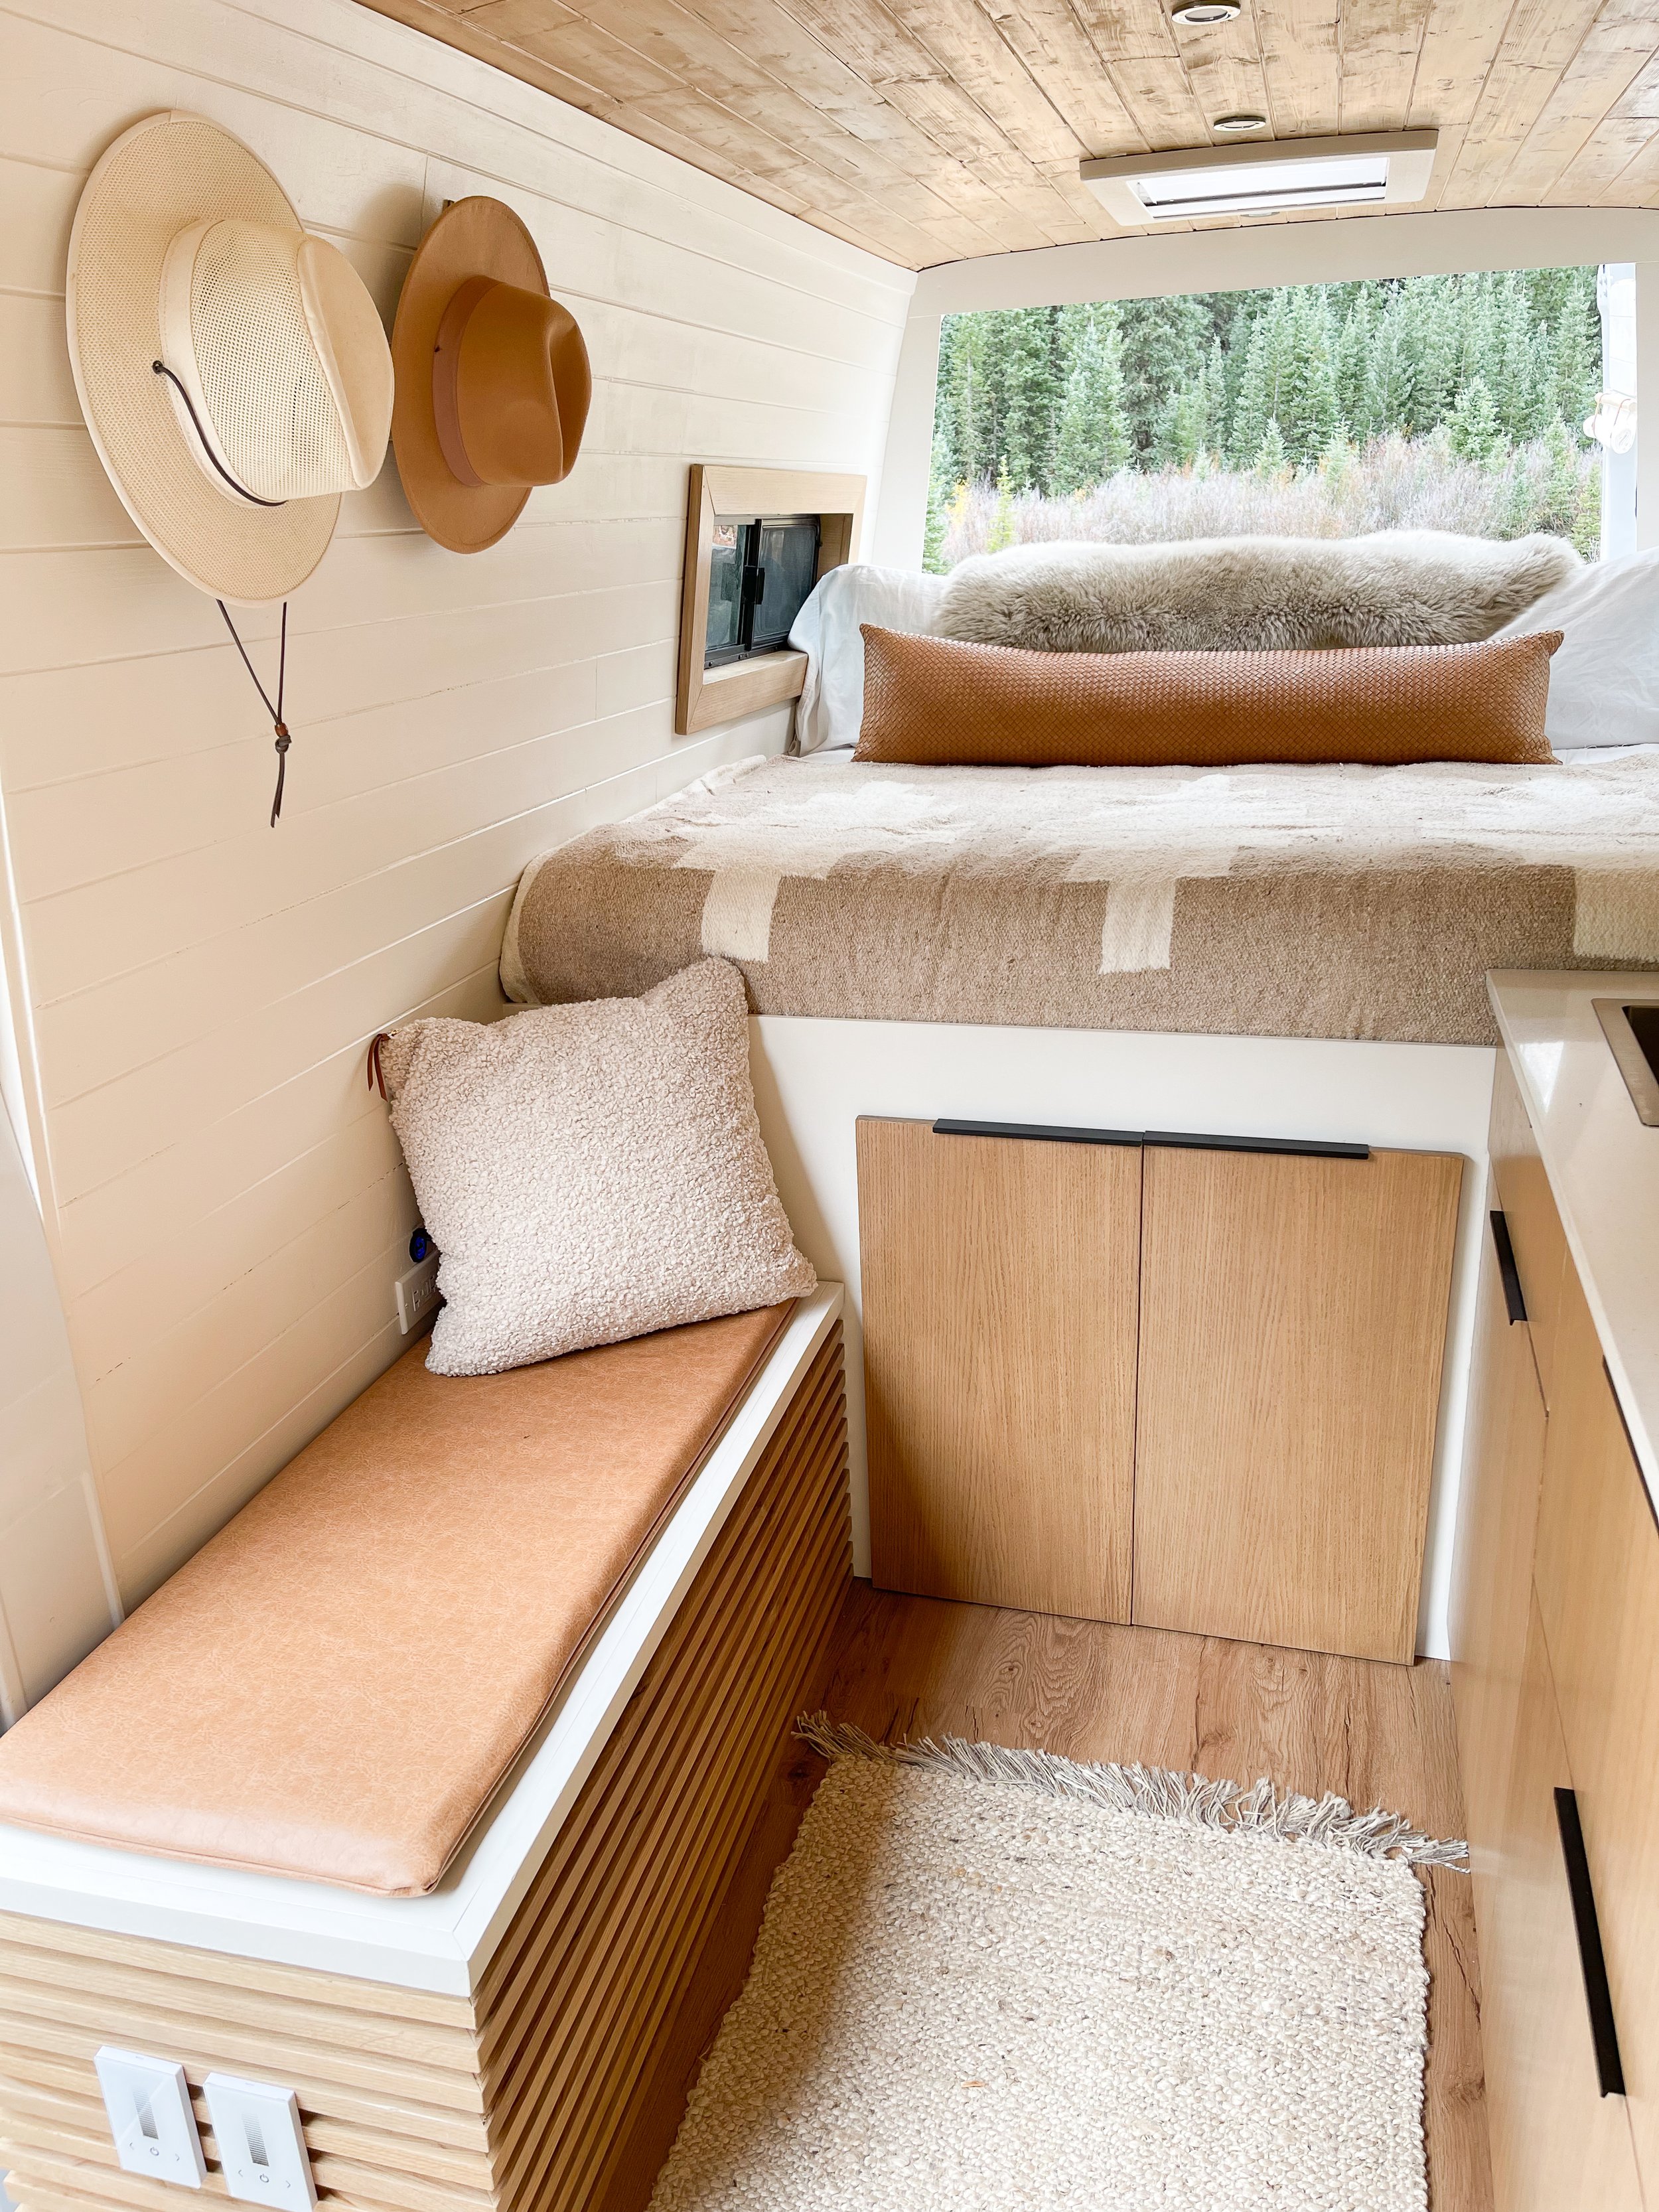
Even before we sold our last van earlier this year, we knew we wouldn’t go long without getting another one! This is our favorite way to travel and its hard to imagine us ever not having one! We loved the layout of our previous van so much, we did basically the same layout. It worked so well for us. There is plenty of space to store everything we need to carry on road trips, while still leaving plenty of room to spend time inside and not feel cramped (and still have a King size permanent bed set up in the back).
There is a sink, hot shower, hidden refrigerator, toilet and the whole van is self contained. Meaning, you never need to “plug in” anywhere. The solar panels on the roof and battery isolator (which charges your house batteries from the van itself) insure you have all the power you need to power everything in the van and charge all your devices. We’ll dive into the specifics further into this post.
Some of these links are affiliate links which means we may earn a small commission from them

Let’s start with the “pretty” stuff then we’ll get into more of the details of the build.
All of the with wood, with the exception of the ceiling, is rift sawn white oak. The ceiling is pine. We wanted a very clean, modern look in this build while still having some design interest!
We chose to do quartz countertops and were SO beyond happy with them. We went with the smallest thickness we could to save on weight. (Speaking of weight…we make sure to balance weight in the rig by putting heavy items on alternate sides. The water and countertop is on the driver’s side, but the batteries are on the passenger side and those suckers are HEAVY!!!)
The black finger pull hardware is linked here. We chose the 10” length to add some drama to the otherwise simple looking hardware. Speaking of drama and large hardware…for the tall cabinet we used an 18” pull! I’ll link it here.
The walls are painted Shoji White by Sherwin Williams.
The flooring is linked here. We’ve used this in both vans and multiple other RV renovations and absolutely love it. It holds up SO well to everyday wear and tear!
Rug linked here.
I made the bench cushion using a faux leather fabric.
The pillow on the bench is linked here.
The lumbar pillow on the bed is linked here.
The fur throw is linked here.
The blanket at the foot of the bed is linked here.
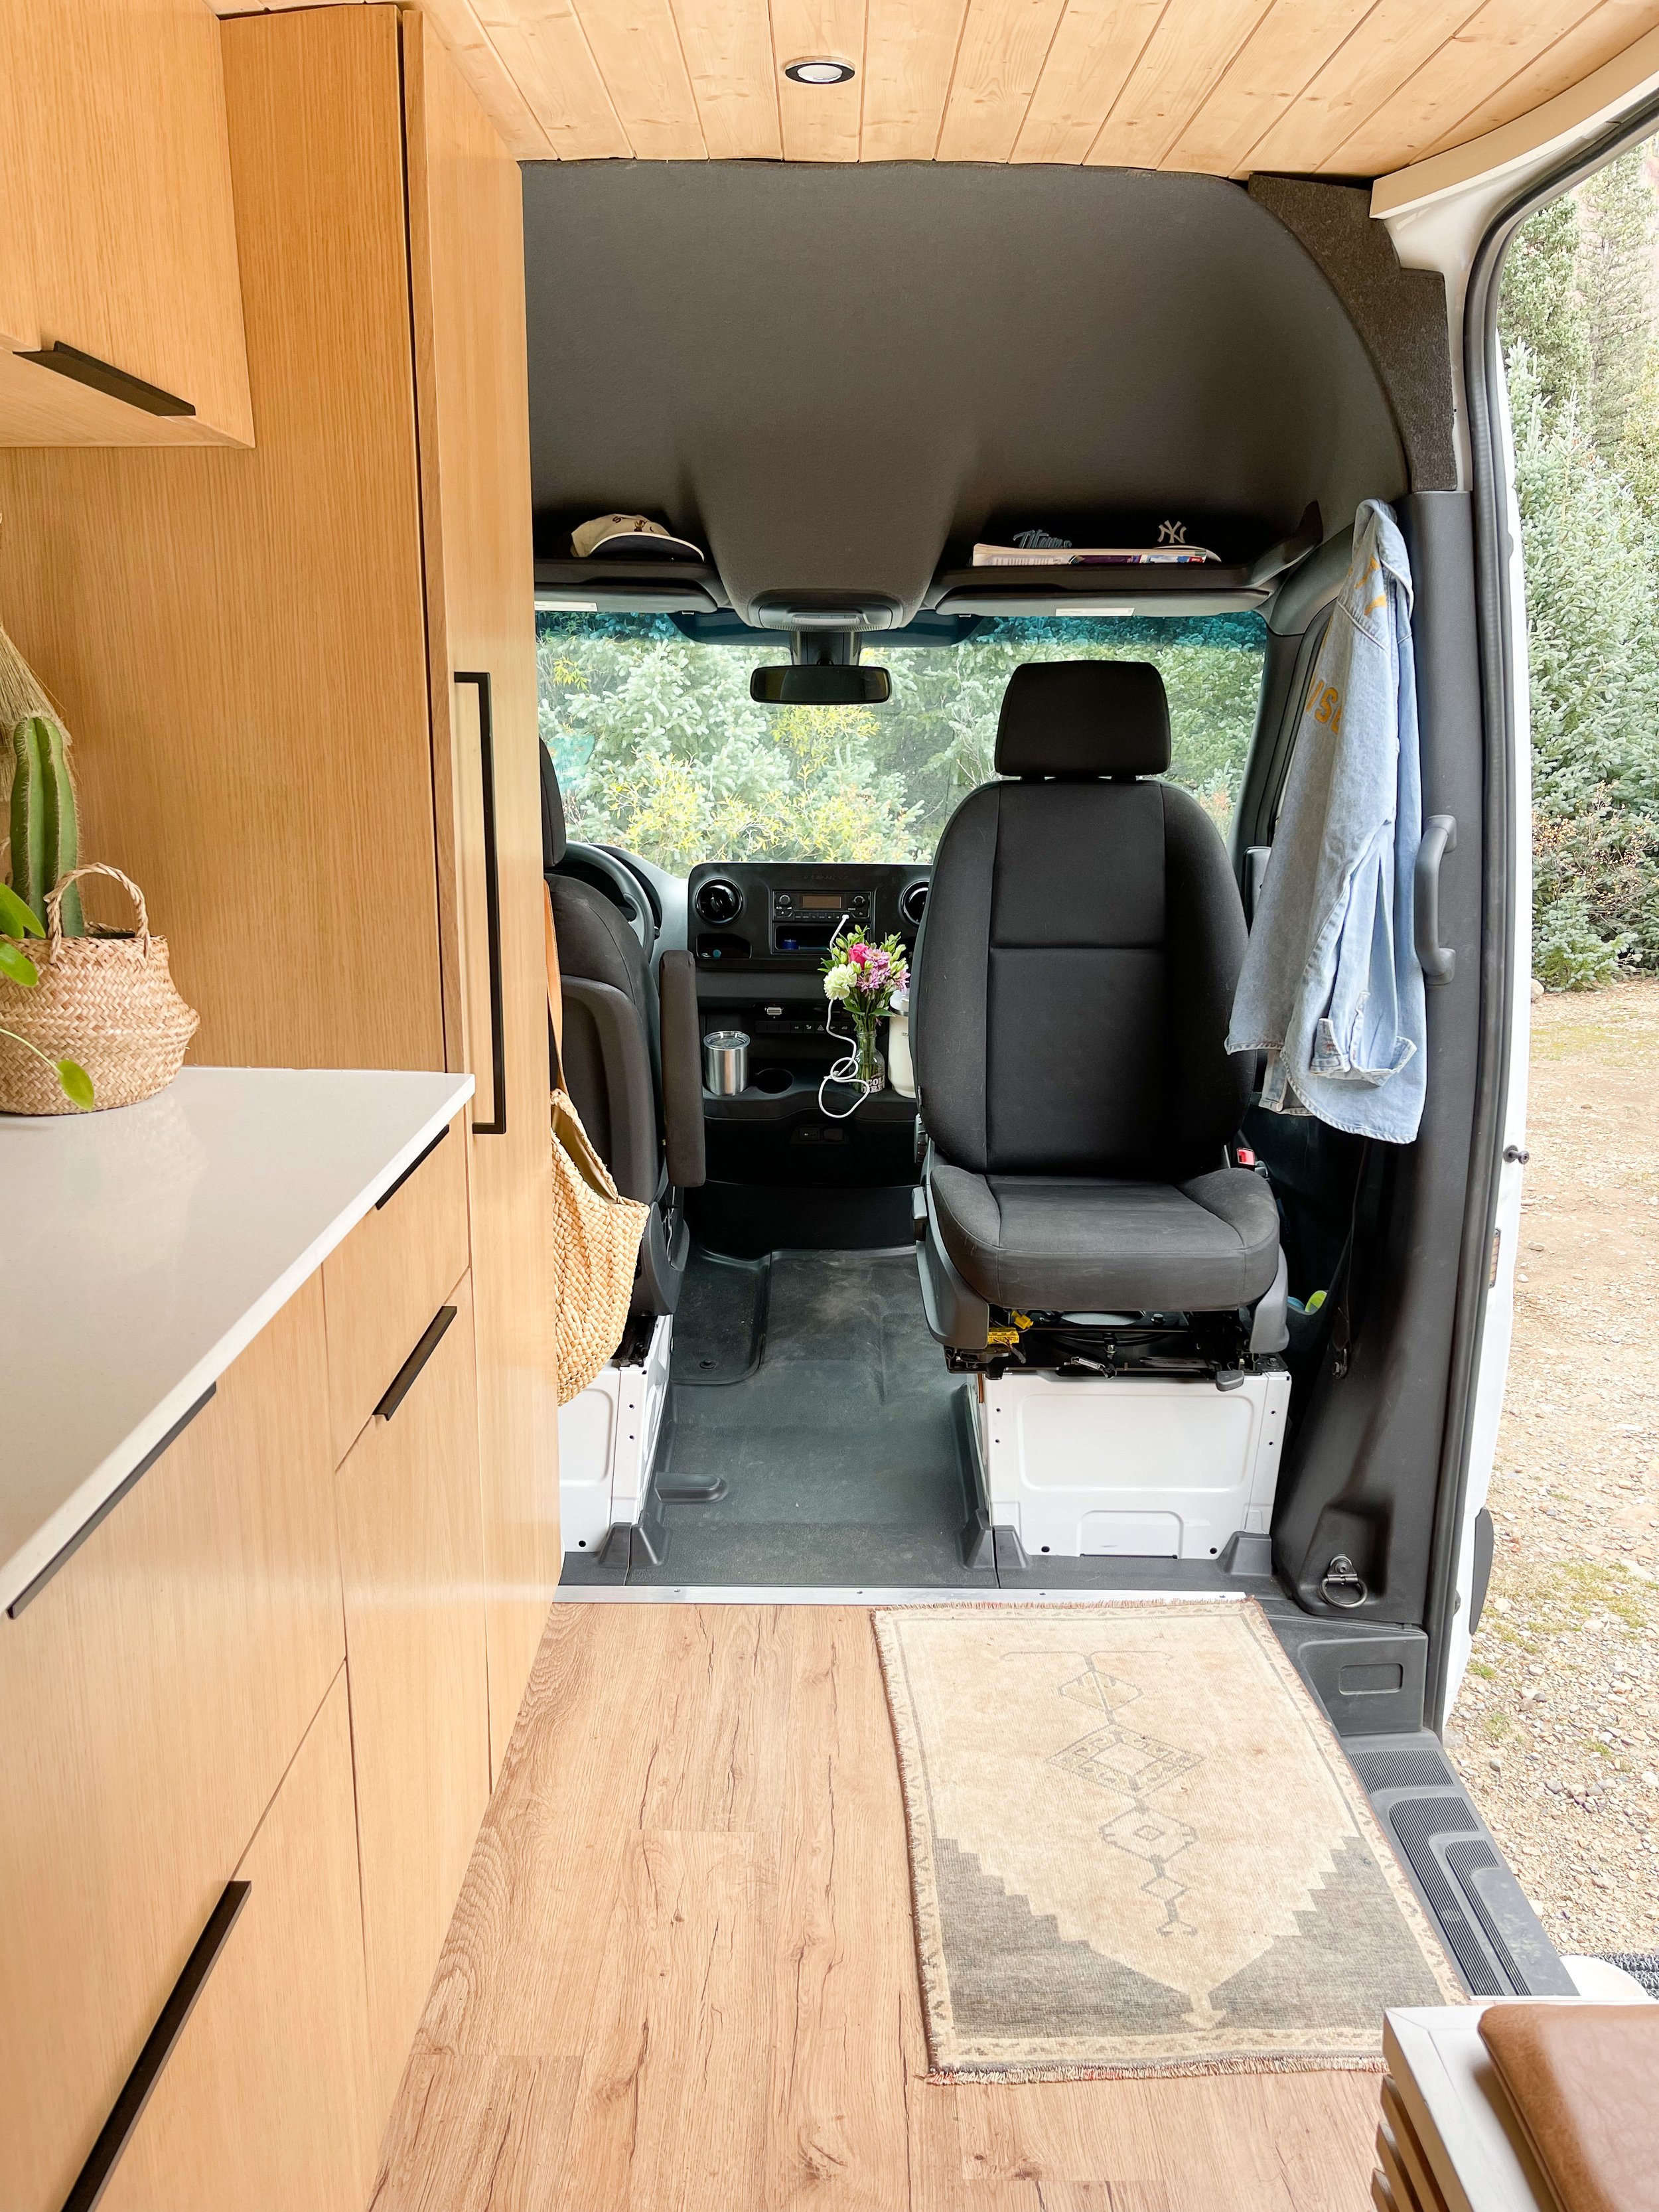
There is also a full length mirror on the back of the tall cabinet behind the driver’s seat!
And one more thing….over the bed…thats a skylight!!! You can open it at night while laying in bed to look at the stars!

so What’s in all of those cabinets?
There is a story sequence on Instagram I filmed showing what we keep in the cabinets. I’ll link it here.
TOILET - Something thats slightly different now, is instead of keeping Olive’s things in the cabinet underneath the small drawer, there is a toilet there now! We didn’t have one just because thats how we’re used to traveling, but we also realize most people would like to have their own toilet in their rig! We did a bunch of research and read a LOT of reviews and settled on this toilet. As long as you use tabs similar to these, it won’t smell! You dump it every so often at a dump station (it has a valve that is the same size as an RV dump hose (the toilet has a gauge so you know when its time to dump!).
SINK and PLUMBING - We had a similar sink in our last build and loved it. It is very deep and plenty wide enough to get pots and pans in there to wash them. I’ll link it here. The faucet is linked here. The pressure for this sink is fabulous! Just as strong as you would have in a house! Let’s go over the system…We start with the fresh water tank (linked here). We have this one for both the fresh and gray water tanks (although I labeled the gray tank with a black X so you won’t get them mixed up when dumping them!). From the fresh tank there is a plastic tube that runs from there to our water pump. We use this one. The water runs out of this pump and to the faucet! Then down the drain through the drain pipe into the gray water tank. We love having the ability to carry our water canisters to a water spigot instead of having to hook up a hose to the van. We never want for water and we even carry an extra canister in the “garage” space under the bed so we can go longer between finding water.
REFRIGERATOR - We have this one by Dometic. We’ve been very pleased with it as we had it in our last van and bought the same one for this rig! You can monitor the temperature from an app and set alerts so if, for some reason, you lose power to the refrigerator, you will be notified so your food doesn’t go bad! It can be used as a refrigerator or a freezer.

Passenger Swivel, Garage and Shower
As you see in the photo on the left, the passenger seat is on a swivel base. This makes a WORLD of difference with the amount of space inside! We didn’t have this in our last van and its one of our favorite modifications we made. We will absolutely do this in any future builds. (*note, you also get a great shot of that huge cabinet pull in this photo!!)
In the photo on the right, you get a great shot of the “garage”. There is so much room down here to keep all your gear. This space is really the difference maker for us in being able to stay on the road for long periods of time. We’re able to store our outdoor furniture, extra clothing, extra water, shower supplies, extra shoes…whatever! You can fit so much back there!
SHOWER - I have two videos regarding the shower here and here. We have a Joolca on demand shower, linked here. Easy to set up, and HOT HOT water! The temperature and pressure is easily regulated and we have a pop up shower we use that keeps the warmth in so there’s no freezing in the shower even in low temps! This was a MAJOR upgrade from our previous build and it was a game changer! Hot showers make all the difference.


electrical system
There are two sides to the electrical system, the “pretty” parts you see (like the lights!) and then the functional items like the system you see on the right.
Let’s discuss lights and outlets first.
LIGHTING - The lighting in here is SO good. There is overhead lighting, under cabinet lighting (both on separate dimmers) and then LED strips in the toe kick of the cabinets and also around the arch of the back doors (these two are on dimmers AND timers…we would turn these on and set timers when we got in bed…its SO nice!). The strips for the toe kick and bed lights are controlled with remotes and then the overhead and under cabinet lights are controlled with the switches you see on the end of the bench.
OUTLETS - If you don't already know, there are two different types of outlets, 12V + 120V. 120V outlets are what you plug a standard" “plug” into. The 12V outlets you either use something that looks like cigarette lighter from an old car OR a USB. There is one 12V and one 120V behind the decorative pillow on the bench. There is a USB outlet on the passenger side of the bed in the rear. We charge our phones with this one! Then there is an 12V and a 120V outlet near the tall cabinet behind the drivers seat.
LET’S TALK ABOUT THE ELECTRICAL SYSTEM - shown in the photo on the right. This electrical system is VERY similar to our system in our last van. Everything worked SO well for us, we decided to roll with the same components since we know they’re tried and true! We can easily go for days powering everything in the van and also our electronics. Because we have both solar and a battery isolator, even if its cloudy, you can turn the van on and charge your batteries! I’m going to link everything here. Batteries. Inverter. Battery Isolator. Charge Controller. Battery Monitor. Inverter Switch. <both of these are located in the bench! Our batteries and solar panels can be monitored via an app!

Let’s talk exterior! One of the best upgrades we made to both this van and our last van, is adding the BF Goodrich K02 All terrain tires! You wouldn’t believe the difference they have made. Snow, mud, sand…no prob! We’ve done it all. What we’ve found is the places we can’t go because we don’t have 4x4, we would never take a van this big anyway! I can only think of two times in the past 3 years of traveling in vans that we didn’t drive somewhere because we didn’t have 4x4…and again, we wouldn’t have gone past where we turned around even if we had it! There are windows in the back doors, the two small windows on either side of the bed, and then the window in the sliding door. We have insulated window covers for all the windows so if you want to stealth camp, you can! The windshield and cab windows have Weathertech shades and then all the windows in the rear of the van have custom made, fabric covered, insulated black out shades.